FastLED for Arduino-powered LED Animations
This blog post will walk through the development of the demo in the video below, and the accompanying code here.
Before diving in, I’d like to note that I hope to make longer animations in the future. The truth is that this one actually took a fair amount of time, maybe 4 or 5 hours! There are two main reasons why:
-
I wanted the animations to be entertaining and cool. Specifically, I didn’t want every frame to be just the illumination of some interval of lights. For each new animation that I design, more code has to be written (ie a new function to blink every other light, or to make a gradient, for example). This isn’t necessarily difficult, but it adds to the work.
-
I wrote the show! Probably a good hour was spent listening to the music and thinking of what patterns to display with the lights. Moreover, some ideas may seem good in my head, but not look as good as I’d like when animated, and will either need to be adjusted or to be discarded completely. Maybe I just have a slow creative process.
I also had to set up the electronics and figure out how best to sync the lights with the song (discussed more below). The good news is that my future LED projects will benefit from the fact that I won’t have to do this init work again.
Right, here’s what I’ll talk about:
1) How the Arduino Uno is connected to the LEDs.
2) How the LEDs are illuminated in code.
3) How this is done in sync with the music.
How the Arduino Uno is connected to the LEDs
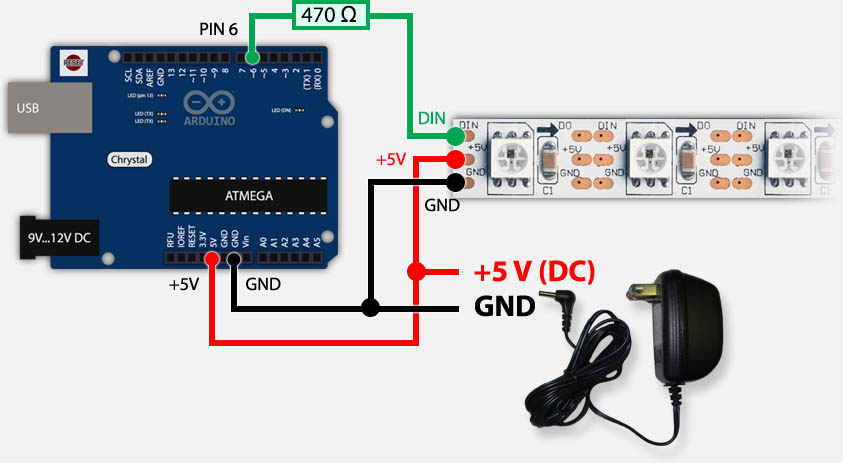
The above diagram represents my setup except for a few differences. Firstly, my WS2811 LED strand has two ground wires for some reason. Second, I used a 12V DC power supply connected to the 9-12V DC input on the Arduino, and connected the +5V wire of the LEDs to the 5V pin on the Arduino. I’ve done some reading, and have determined that this was pretty naive and stupid on my part. When plugged into the wall, the 5v pin on the Arduino is comfortable with ~900 milliamps, if Stack Exchange can be trusted. The strip of LEDs can be considered a parallel circuit, where each RGB LED’s maximum current is about 60 mA (20 for each channel, 3 channels). Here’s the datasheet for the WS2811 LED chip. The total current from the Arduino’s 5v pin to its GND pin is the sum of the currents through every RGB LED, such that for a strip of 50 of these components, a max current of \(50*60=3000\) mA will be drawn when all LEDs are white (all channels set to max value). Therefore, if the data sent from pin 6 tells the WS2811 chips to all draw 60 mA, then I will be exceeding the maximum current by a factor of 3. Why is this bad? I actually don’t know, but it’s easy to imagine what bad things can happen when more current goes through the Arduino’s components than it’s comfortable with.
Anyways, I was able to accidentally avoid disaster by deciding that the LEDs were too bright at max values, and deciding that RED’s RGB setting would be (25, 0, 0) instead of (255, 0, 0). This probably stemmed from my experimenting with the LEDs indoors, instead of on my house as Christmas decorations. In any event, it reduced the max current draw from 3000 mA to a safe 300 mA (or so I believe).
Edit: I took a multimeter to the circuit. The maximum current was 135 mA. Disaster averted!
How the LEDs are illuminated in code.
Here is some code from the documentation of the FastLED library.
#include "FastLED.h"

CRGB leds[1];
void setup() { FastLED.addLeds<NEOPIXEL, 6>(leds, 1); }
void loop() {
    leds[0] = CRGB::White; FastLED.show(); delay(30);
    leds[0] = CRGB::Black; FastLED.show(); delay(30);
}
We first set up an array of CRGBs, whose size is the number of LEDs in the strip. The first element of this array is a CRGB object which defines the RGB value for the first LED light, the second element of the array for the second light, and so on. In my code, I make frequent use of the constructor CRGB(uint8_t r, uint8_t g, uint8_t b), which allows me to create a CRGB object based on the RGB values of the desired light. Then, we use the addLeds method to specify the type of LED chip (in my case, WS2811), the data output pin on the Arduino (pin 6), the location of the CRGB array, and the size of the array. Next, we populate this array with colors. Finally, we call FastLED.show().
The library is very nicely documented, and can create some really cool animations! For example, here’s a fire animation powered by FastLED.
How this is done in sync with the music.
At first, I tried to use the delay() function in between calls to FastLED.show(), such as in the demo code above. The problem with this method is that the timing of the call to delay() is not specified. For example, in the above code, the call to delay(30) in the first line of the loop() function could take place 5 milliseconds after the function begins, or 10 milliseconds after the function begins, depending on how long it takes for (leds[0] = CRGB::White; FastLED.show();) to execute. This uncertainty will be aggravated when the code between calls to delay() is longer or more complicated (which it very much is in my demo). Furthermore, when the loop function is long (mine is hundreds of lines), the more this problem will cause the program to be out of sync with the music.
This variation is unacceptable, we need the code to execute exactly when we want it to. The trick is the millis() function, which “returns the number of milliseconds since the board started running its current sketch”, as in this example.
To illustrate how this function is used in the LED program, consider the following code:
leds[0] = CRGB(25,25,25);
while( millis() < 1000 ){}
FastLED.show();
leds[0] = CRGB(25,0,0);
while( millis() < 2000 ){}
FastLED.show();
This program turns the first light white at 1 second after the loop has started, and then red 2 seconds after the loop has started. Actually, the white light won’t show at exactly one second after the function starts, but the error will be basically imperceptible. Anyways, the problem that this method solves is that the function will never fall behind or get ahead of the music due to variations in execution time.
Take, for example, the second call to FastLED.show() in the above code. Clearly, that call cannot possibly execute before 2 seconds have elapsed. But can’t it take place after 2.5 seconds have elapsed, or more? First, let’s note that the call to millis() is very very fast; I don’t know how fast, but I doubt it takes more than 2 milliseconds. Suppose it takes 2 milliseconds, and that the while loop undergoes at least 2 iterations. Clearly, in the penultimate iteration, (millis() < 2000) was true, and in the final iteration, it was false. Then the final iteration finished at 2.002 seconds into the function, or earlier. Therefore, if the while loop undergoes at least 2 iterations, then the FastLED.show() call is executed at very very close to 2 seconds after the function started (you may notice that I’m avoiding saying “at the second second”).
Of course, this argument falls apart if the while loop undergoes only one iteration. But what would it take for this to happen? It would have to be the case that the code since the last while loop took more than a second to execute. However, as long as the code we write to populate the leds array is not too complicated (such as in the above example), this will never be a problem. In my Mad Russian code, the shortest amount of time between two such while loops is about 107 milliseconds (which is the length of one sixteenth note during the faster part of the song). Moreover, the instructions between the while loops never do more than two iterations over the leds array (and my code is highly suboptimal). 107 milliseconds is plenty of time to do this. Also, here’s a quick sanity check: if the instructions to update your LEDs take longer than the time between frames of your animation, then real-time execution of your animation is impossible, you’ll have to do some precomputations.
Disclaimer: As I write this, I realize that my code puts the while loop after the call to FastLED.show(), rather than before. This results in good synchronization throughout the entire song, but the calls to FastLED.show() may each come a few milliseconds late. If the number of milliseconds is always pretty much the same (which seems reasonable in my code), then this is only a problem if the start of the function is synced with the start of the music (which it isn’t in my case). Still, do as I say, not as I do: the code in this blog post is better. I would fix my code, but I’m doing something else with the Arduino now.
To summarize, the method of using a while loop to wait until a certain time to execute a call to FastLED.show() is a great way to keep your program in sync with music. In my code, I use the length of a sixteenth note in the song to determine the time between frame updates.
Of course, all of this requires that the function and the music start at the same time! My current method is to get lucky with the timing (or, as in the video, just use iMovie!).
I hope this post has been informative. If I’ve made a mistake somewhere, I’d love to hear about it, let me know at [email protected]. Hopefully I’ll make another post next year with another Christmas light show!